Make Google Better with Customize Google for Firefox


firefox-google-logo Do you use Google inside Firefox ? If the answer is yes, you definitely need an add-on called Customize Google that makes your favorite Google even better and all the more useful.

And in case you require some more convincing, here are five unique things you can do with Google and Firefox once you have installed Customize Google:

1. Remove Specific Websites from Google Search Results

Don’t like to see pages in Google results that are from Amazon.com or from domains like .info or .biz. With Customize Google, you can easily filter any websites or domains from Google by specifying rules.

block-websites-google

For instance, *amazon* will not show pages that have amazon in the URL while a rule like technorati.com/tag/* will block pages in search results that are from Technorati search. You can extend this idea to block RSS feeds in Google results.

amazon-google-results


2. Keep Your Gmail Account Safe

Last year, Rob Graham demonstrated how he could hack Gmail accounts that were using http: instead of https: to access emails.

https-gmail Anyone can forget typing that additional "s" in the URL so a better alternative is to outsource this job to Customize Google.

It will automatically switch you to a more secure https: login screen while you are logging into any Google service including Gmail, Google Docs, Google Reader, Google Calendar and your Google Web History.

3. Clean URLs in Google Search Results

Did you notice the URL for cricinfo.com website appearing in Google results ? Its cricinfo.com prepended with some tracking code.

google-cricket-score

I am not worried about Google tracking clicks on search results but the problem comes when you have to copy links from the search page - they are cryptic URLs and do not look good when put in email messages. Customize Google removes the click tracking so the search results link directly to the website.

4. Number your Search Results in Google

Customize Google can add a counter next to each of your search results in Google.

This feature comes handy if you are tracking the rankings of your web pages in Google over a period of time or if you have 100 search results on a page and want to know the exact position of the web page that you are interested in.

google-search-numbers

5. Search Flickr, CNN, Yahoo, etc from Google

Customize Google adds links to rival search engines in Google search results including Google Images and Google News. This is a big time saver and you won’t realize how useful it is unless you start using this feature.

google-flickr-image-search

So if you are looking for some pictures on Google Images, you will also see links to Yahoo! Image Search and Flickr - no need to type the query again.

Flash Video Editing Made Simple - Learn Everything about FLV Videos


edit-flv-video-filesFlash Video (flv) has become the default video format on the web and almost every video sharing site uses FLV to stream videos online. And its not just the YouTube clones, even media properties like CNN have switched to Adobe Flash Video.

Other than viewing Flash videos in your browser, some of download FLV files locally to enjoy web videos offline.

Everything You Wanted to Know about Editing FLV Flash Videos

Watching videos in an FLV player is half the fun - you can do so many other things like split FLV videos into multiple clips, trim the introductory part, convert flv videos to MP3 songs, extract image frames from the video, etc. Lets get started:

Q: How to Edit FLV Videos with expensive video editors ?

There are no standalone FLV editors around but if you have Adobe AIR, I highly recommend RichFLV - a lightweight flv editor that lets you do almost everything with FLV video clips.

edit-flv-youtube

With RichFLV, you can split flv files by adding cue-points, join two or more FLV video clips by stitching or add new MP3 sound tracks over your existing FLV video. Perfect if you want to edit YouTube videos on the computer.

Mac users have another good option - download Perian that turns Quick Time Pro into a FLV editor.

Q. How to convert FLV videos into MP3 audio files ?

extract-mp3-flv To extract audio from flv files, get the free FLV Extract utility from moitah.net - the video is saved as an MP3 file and the quality of sound in the original video is maintained as there’s no encoding done to save the audio.

Alternatively, you can extract MP3 from FLV files only using Vixy.net - an online service.

Q. Which media players can play Flash Videos on the desktop ?

To play FLV video files on the desktop, you can use Adobe Media Player, VLC Media Player or this standalone player which I think is the best flv player around for XP or Vista.

If you are on a Mac, you can play FLV videos downloaded from YouTube in your QuickTime player using the free Perian component discussed above.

Q. How to extract image frames from FLV Videos ?

You can export any image frame out of the FLV video using either the RichFLV editor or through VLC Media Player.

Open the .flv file in VLC, navigate to the frame that you want to save as an image and press Ctrl+Alt+S (or Video -> Snapshot). Note that the regular Print Screen key will not work for capturing screenshot from FLV file.

upload-flv-blip Q. Where can you upload FLV Video files on the web ?

Blip.TV - none of the other video sharing sites accept FLV format files.

Related - Why Choose Blip.TV over YouTube

Q. How to Embed FLV video clips in web pages ?

Read this guide on how to embed flv files in web pages. Alternatively, you could upload the file to Blip.TV and use the embed code provided by Blip.TV.

Q. How to Convert FLV videos to other video formats like WMV, AVI, etc ?

Use SUPER - the program may look complex at first glance but don’t worry, it’s very easy. I think it even lets you convert SWF movies into FLV videos.

Q. How to create new FLV movies files from scratch ?

VideoSpin is the only free video editing software I know of that can export movies into Flash Video format. An alternate trick is export your video into Windows Media or AVI and convert it into FLV using a converter program like SUPER .

For more tips and tricks regarding YouTube and Google Videos, check our previous guide on Interesting Things to Do with YouTube Videos.

Useful Windows XP DOS Commands & Tricks


Typing DOS commands on the Windows Command Line prompt is a most efficient and faster way of doing things in Windows XP. Here's a run-down of the most useful DOS commands available in Windows XP. Some of these DOS commands even do not have an visual alternative.

DOS Command-line tools must be run at the prompt of the Cmd.exe command interpreter. To open Command Prompt, click Start, click Run, type cmd, and then click OK.

ipconfig - Windows IP configuration
Useful for troubleshooting your internet connection. Displays the current IP address of your computer and the DNS server address. If you call your ISP for reporting a bad internet connection, he will probably ask you to run ipconfig.

fc - Free BeyondCompare in XP
FC is an advanced DOS Command that compares two files and displays the differences between them. Though the file comparison results are not as interactive as BeyondCompare or Altova DiffDog, fc is still very useful. You can even set fc to resynchronize the files after finding a mismatch.

type - open text files sans Notepad
Similar to Unix cat command, Type is my favorite DOS command for displaying the contents of a text files without modifying them. When used in combination with more switch, type splits the contents of lengthy text files into multiple pages. Avoid using the type command with binary files or you'll hear alien PC beeps and see some greek characters on your PC.

ping - Say hello to another computer
Ping network command followed by the web-address or IP address tells you about the health of the connection and whether the other party is responding to your handshake request. Ping tool can also be used to convert the web address to a physical IP address.

tree - visual directory structure
You often need to take prints of your physical directory structure but XP has no simple "visual" commands for printing directory contents. Here, try the Tree DOS command and redirect the output to a text file.

tree > mydirectory.txt
print mydirectory.txt

attrib - make hidden files visible
Attrib lets you change attributes of System files and even hidden files. This is great for troubleshooting Windows XP. Say your XP doesn't boot ever since you edited that startup boot.ini file (Hidden), use attrib to remove the Hidden attibute and edit the file using EDIT dos command.

assoc - which program will open that .xyz file
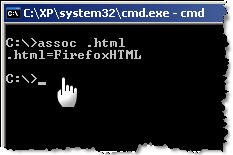
The assoc DOS command can be used to either isplay or even modify the file name extension associations. The command assoc .htm will quickly tell you the name of your default web browser (see picture)

move - more flexible than copy-paste
Say you got a lot of XLS and DOC files in you MyDocuments folder and want to move only those XLS files that have their name ending with 2006. In XP Explorer, you have to manually select each file and then cut-paste to another folder. However, the DOS move command make things much simpler. Just type the following at the command prompt:
move *2006.xls c:\2006Reports\

find - advanced file search with filter
Find is the most powerful DOS command and even more useful than the Windows Desktop Search tool or the Windows Find Wizard. The find command searches for a specific string of text in a file or files. After searching the specified file or files, find displays any lines of text that contain the specified string.

To search your hard disk to find and display the file names on drive C: that contain the string "Google" use the pipe (|) to direct the results of a dir command to find as follows:
dir c:\ /s /b | find "Google"

Quick tip - Drag to avoid typing: When your command acts on a file or folder, you must type the path to that folder after the command. You can save typing time by dragging the file or folder from Windows Explorer into the command window.

To view help at the command-line, at the command prompt, type the following:
CommandName /?

ULTIMATE REGISTRY GUIDE Part II

Must−Know Concepts
Learning the concepts in the following sections is important to your satisfaction with this book.
These are the things you must know to work efficiently with the registry. For example, the registry is
filled with hexadecimal numbers, and if you don't understand hexadecimal, they're not going to
make sense to you. If you're a programmer, you can probably skip these sections; otherwise, don't
The following sections walk you through the most important of these concepts, beginning with
security and globally unique identifiers. You learn how to read hexadecimal numbers and convert
them to binary and decimal notation and use them as bit masks. You learn the difference between
Unicode and ANSI character encoding. You even learn how Intel−based computers store numbers
in memory. All of these topics are significant to your ability to use the registry as a tool.
Security Identifiers
Computer accounts, user accounts, groups, and other security−related objects are security
principles. Security Identifiers (SIDs) uniquely identify security principles. Each time Windows XP or Active Directory creates a security principle, they generate a SID for it. Windows XP's Local Security
Authority (LSA) generates SIDs for local security principles and then stores them in the local
security database. The Domain Security Authority generates SIDs for domain security principles
and then stores them in Active Directory. SIDs are unique within their scope. Every local security
principle's SID is unique on the computer. And every domain security principle's SID is unique within
any domain in the enterprise. What's more, Windows XP and Active Directory never reuse a SID,
even if they delete the security principle to which that SID belonged. Thus, if you delete an account
and then add it back, the account gets a new SID.
The important thing to remember is that every account has a SID. It's kind of like having a passport
number that uniquely identifies you to immigration. You can refer to an account by its name or by its
SID, but in practice you seldom use the SID because its format is cumbersome. You frequently see
accounts' SIDs in the registry, though, and that's why you're learning about them here.
An example of a SID is S−1−5−21−2857422465−1465058494−1690550294−500. A SID always
begins with S−. The next number identifies the SID's version—in this case, version 1. The next
number indicates the identifier authority and is usually 5, which is NT Authority. The string of
numbers up to 500 is the domain identifier, and the rest of the SID is a relative identifier, which is
the account or group. This is a real rough overview of the format of a SID, which is much more
c o m p l e x t h a n t h i s b r i e f e x a m p l e . I f y o u w a n t t o l e a r n m o r e a b o u t S I D s , s e e
http://www.microsoft.com/windows2000/techinfo/reskit/en/distrib/dsce_ctl_xgqv.htm, which is a
section in the Windows 2000 Resource Kit about SIDs.
Some SIDs are shorter than the previous example, such as S−1−5−18. These are well−known
SIDs, and they are the same on every computer and in every domain. They are interesting because
they pop up over and over again in the registry and in other places. Table 1−1 describes Windows
XP's well−known SIDs. I've italicized the names of SIDs that are of particular interest to you while
you're reading this book. The placeholder domain is the SID's domain identifier.
Table 1−1: Well−Known SIDs
SID User or Group name
S−1−0 Null Authority
S−1−0−0 Nobody
S−1−1 World Authority
S−1−1−0 Everyone
S−1−2 Local Authority
S−1−2−0 Local
S−1−3 Creator
S−1−3−0 Creator Owner
S−1−3−1 Creator Group
S−1−3−2 Not used in Windows XP
S−1−3−3 Not used in Windows XP
S−1−4 Nonunique Authority
S−1−5 NT Authority
S−1−5−1 Dialup
S−1−5−2 Network
S−1−5−3 Batch
S−1−5−4 Interactive
S−1−5−5−X−Y Logon Session
S−1−5−6 Service
S−1−5−7 Anonymous
S−1−5−8 Not used in Windows XP
S−1−5−9 Enterprise Domain Controllers
S−1−5−10 Self
S−1−5−11 Authenticated Users
S−1−5−12 Restricted
S−1−5−13 Terminal Service User
S−1−5−14 Remote Interactive Logon
S−1−5−18 LocalSystem or System
S−1−5−19 LocalService
S−1−5−29 NetworkService
S−1−5−domain−500 Administrator
S−1−5−domain−501 Guest
S−1−5−domain−502 krbtgt
S−1−5−domain−512 Domain Admins
S−1−5−domain−513 Domain Users
S−1−5−domain−514 Domain Guests
S−1−5−domain−515 Domain Computers
S−1−5−domain−516 Domain Controllers
S−1−5−domain−517 Cert Publishers
S−1−5−root domain−518 Schema Admins
S−1−5−root domain−519 Enterprise Admins
S−1−5−root domain−520 Group Policy Creator Owners
S−1−5−domain−553 RAS and IAS Servers
S−1−5−32−544 Administrators
S−1−5−32−545 Users
S−1−5−32−546 Guests
S−1−5−32−547 Power Users
S−1−5−32−548 Account Operators
S−1−5−32−549 Server Operators
S−1−5−32−550 Print Operators
S−1−5−32−551 Backup Operators
S−1−5−32−552 Replicator
S−1−5−32−554 Pre−Windows 2000 Compatible Access
S−1−5−32−555 Remote Desktop Users
S−1−5−32−556 Network Configuration Operators
S−1−6 Site Server Authority
S−1−7 Internet Site Authority
S−1−8 Exchange Authority
S−1−9 Resource Manager Authority


Deploying with Answer Files
Users installing Microsoft Windows XP on their own computers don't often worry about automating
the setup program. Instead, they drop the CD in the drive, the setup programs starts, and they
answer the setup program's prompts. That won't work in a business because most business users
don't know the answers to all the setup program's questions. Automating the setup program
prevents users from having to fumble with the installation. Furthermore, as an IT professional, you
want to ensure that users have a positive experience so that they say good things about you.
You should still consider automating Windows XP installation even if you are a power user. It makes
installing Windows XP more convenient, and options are available to you through answer files that
just aren't available through the setup program's user interface.
Microsoft provides several tools that help you to deploy automated and customized Windows XP
installations. Each tool has purposes, strengths, and weakness that are different from the other
tools in various deployment scenarios. Examples of deployment tools include Sysprep for disk
imaging and Remote Installation Service, both of which come with the Microsoft Windows 2000
Server and Microsoft Windows .NET Server family of products. Every deployment method and tool
has unattended answer files, which you use to automate the setup program so that it runs with little
or no user interaction. The operating system's setup program uses the information contained in the
answer files rather than prompting users for it.
Answer files are text files that look like INI files. Answer files have many sections, and each section
contains settings. Because this book is about Windows XP's registry and user settings rather than
desktop deployment, I only introduce you to answer files.
After you learn the basics, I'll describe two answer file features that specifically enable you to deploy
user settings as part of the Windows XP setup process. If you're interested in learning more about
deploying Windows XP, see the Microsoft Windows XP Corporate Deployment Tools User's Guide.
You find it in Deploy.chm, which is in the Deploy.cab cabinet file in the Support\Tools folder of your
Windows XP CD. You start this chapter by learning how to add files to Windows XP distribution files


ULTIMATE REGISTRY GUIDE Part I

Chapter 1: Learning the Basics
Overview
The registry has a subtle but important role in Microsoft Windows XP. On one hand, the registry is
passive—it's just a big collection of settings sitting on your hard disk, and you probably don't think
much about it while you're editing a document, browsing the Internet, or searching for a file. On the
other hand, it plays a key role in all those activities. The settings in the registry determine how
Windows XP appears and how it behaves. They even control applications running on your
computer. This gives the registry great potential as a tool for power users or IT professionals,
enabling them to customize settings that aren't available in the user interface.
This chapter introduces the registry to you. First you learn about the registry's role and how it fits
into your world. Then I explain some important terminology to ensure that we're speaking the same
language, and you see how Windows XP organizes the registry. Next you learn about the tools I
use to edit the registry. And last, you see how Windows XP stores the registry on the hard disk.
Throughout this chapter, you'll find several tidbits that are useful beyond the registry. For example,
you learn about the two different architectures for storing numbers in memory, which IT
professionals run into as much outside the registry as inside.
This is all basic information, but don't skip this chapter. Read it once, and you'll be set for the rest of
this book.
Heart and Soul of Windows XP
Windows XP stores configuration data in the registry. The registry is a hierarchical database, which
you can describe as a central repository for configuration data (Microsoft's terminology) or a
configuration database (my terminology). A hierarchical database has characteristics that make it
ideally suited to storing configuration data. Lay out the database in a diagram, like the one shown in
Figure 1−1, and it looks like an outline or organization chart. This allows settings to be referenced
using paths, similar to file paths in Windows XP. For example, in Figure 1−1, the path A\G\M
references the shaded box. Also, each setting is an ordered pair that associates a value's name
with its data, similar to the way the IRS associates your social security number with your tax
records. The registry's hierarchical organization makes all settings easy to reference.


Figure 1−1: The registry is a hierarchical database that contains most of Windows XP's settings.
You can do nothing in Windows XP that doesn't access the registry. I use a tool to monitor registry
access and often leave it running while clicking around the operating system's user interface. I
almost never see this monitor idle. With every click, Windows XP consults the registry. Every time I
launch a program, the operating system consults the registry. Every application I use looks for its
settings in the registry. The registry is certainly the center of attention.
I've written other books about the registry, and in them I call the registry the operating system's
heart and soul. Aside from being a central place to store settings, the registry by its very nature
allows complex relationships between different parts of Windows XP, applications, and the user
interface. For example, right−click different types of files and you see different shortcut menus.
Settings in the registry make this type of context−sensitive user interface possible. The settings for
each user who logs on to Windows XP are separate from those of other users—again because of
the registry. Windows XP's ability to use different configurations for laptop computers depending on
whether they're docked or undocked is due in large part to the registry. Even Plug and Play
depends on the registry.
For Power Users
So the registry is important, but what good is learning about it for power users? Well, first, being a
technology enthusiast (the high−brow way to say geek) implies that you like to dabble with
technology to learn more about it. What better way to learn more about Windows XP than to figure
out how and where it stores settings? The process is analogous to tearing apart your VCR so that
you can learn how it works. If you've ever wondered why the operating system behaves a certain
way, the answer is often found by consulting the registry.
Mastering the registry has concrete advantages for power users, though. Because it is the operating
system's configuration database, backing up your settings is a bit easier than it would be without the
registry. And unlike in the old days when settings were stored in INI files, you always know where to
begin looking when you need to find a value. But the biggest advantage of mastering the registry is
more exciting and very real: You can customize Windows XP and the applications that run on it in ways that aren't otherwise possible. Windows XP has thousands of settings that you'll never see in
any dialog box but that you might want to customize. For example, you can redirect your Favorites
folder to a different place, improve your Internet connection's performance, and add commands to
any type of file's shortcut menu. Chapter 4, "Hacking the Registry," details many different
customization possibilities.
For IT Professionals
IT professionals rely on the registry because it enables most of the management features they use.
Large portions of this book focus on those features and how they use the registry.
Policy management is the biggest feature. IT professionals use policies to configure computer and
user settings to a standard, and users can't change those settings. For example, I recently used
policies to configure users' screen savers so that they lock the desktop after 15 minutes of idle time,
which secures users' computers if they walk away from their desks without logging off from
Windows XP. Policy management is a great boon to every IT organization because it can lower
costs and boost user productivity.
IT professionals can manage the registry's security, which lets users run legacy applications in their
restricted accounts instead of logging on to their computers as Administrator (a bad idea in any
enterprise environment). You can manage the registry's security directly or using a tool such as
Security Configuration And Analysis to automate the process. (For more information, see Chapter 7,
"Managing Registry Security.")
Also, IT professionals can use a combination of scripts and the registry to automate customizations.
One IT professional with whom I worked recently wrote scripts to clean up and configure users'
computers after installing Windows XP on them. You can address most needs with a good script.
An indirect but important benefit of the registry to IT professionals is application compatibility.
Microsoft defines standards for where different types of settings belong in the registry. The company
has standards for file associations, Plug and Play configuration data, printer settings, application
settings, and much more. Applications that follow these standards are more likely to work well with
the operating system, not to mention other applications, because they're all looking for the same
settings in the same places. For that matter, most applications that work well in Microsoft Windows
2000 will work just fine in Windows XP, given that the overall structure of the registry doesn't
change much between the operating systems.
The registry enables too many other management features for IT professionals to neglect mastering
it. Some of those features include the following (see Figure 1−2):
· Deployment customization
· Folder redirection
· Hardware profiles
· Offline files
· Performance monitoring
· Roaming user profiles
· Windows Management Instrumentation


how to hide a file in a image

1. Gather the file you wish to bind, and the image file, and place them in a folder. For the sake of this demonstration, I will be using C:\New Folder
-The image will hereby be referred to in all examples as fluffy.jpg
-The file will hereby be referred to in all examples as New Text Document.txt

2. Add the file/files you will be injecting into the image into a WinRar .rar or .zip. From here on this will be referred to as (secret.rar)

3. Open command prompt by going to Start > Run > cmd

4. In Command Prompt, navigate to the folder where your two files are by typing
cd location [ex: cd C:\New Folder]

5. Type [copy /b fluffy.jpg + secret.rar fluffy.jpg] (remove the brackets)

Congrats, as far as anyone viewing is concerned, this file looks like a JPEG, acts like a JPEG, and is a JPEG, yet it now contains your file.

In order to view/extract your file, there are two options that you can take

a) Change the file extension from fluffy.jpg to fluffy.rar, then open and your file is there
b) Leave the file extension as is, right click, open with WinRar and your file is there

Cleverly Repair Large Corrupted Files with BitTorrent Client Checksum Hash Scans

I admit, I have a very fast broadband connection at home. My link speed is more than 6 Mbps. You’d think I can’t complain. But there are some files that seem to download for an eternity. Take, for instance, the Windows Vista Beta. On my connection, that 4 GB bloatware *.ISO mammoth took about two hours to download. Even, when I used DownThemAll!, it took about an hour and a half! That is way too much time to spend for downloading.

hash.jpgCorrupted *.ISO Image File
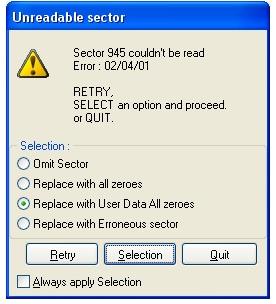
When I was writing one of my most recent articles on free T-Mobile Hotspots and Microsoft Windows Beta virtualization, I needed a copy of Windows Vista Beta. I wasn’t exactly looking forward to another 2-hour wait of download time. So, I checked my stack of burned CDs and DVDs for an old copy. To my good luck, I found the original copy of Vista. I just had to rip it to my hard drive for faster virtualization. Unfortunately, there were about 5 unrecoverable disk sector read errors. “Maybe,” I rationalized, “Vista won’t really care if there are just a couple of corrupted data bytes. Besides, I just need it for one small task.” I was wrong. The Windows Vista installation program actually performs a corruption test to make sure everything is set before actually proceeding with the installation.

To think that 4 tiny sectors in the DVD hampered my schemes of exploiting T-Mobile! Would I have to redownload the ISO image online to continue with my plans? No! Fortunately, I found a forum thread from Locker Gnome (bless Chris Pirillo) that helped deal with corrupted Vista ISO image error 80070241 code. The solution was simply ingenious!

BitTorrent Checksum Hash Scans
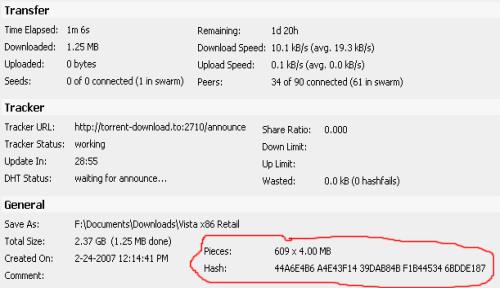
To repair large corrupted files, you have to understand how hash scans and torrents work. A *.torrent file contains two important pieces of information, the torrent tracker address and the hash key. The address of the torrent tracker contains all the IP addresses that have pieces of the desired file. The torrent client downloads data segments of the desired file from different IP addresses referred to by the tracker. Depending on the size of the desired file (in my case 4 GB), there can be hundreds of file segments to download. After each segment is downloaded, the torrent client uses the hash key to validate the data so each file segment is exactly the same as the one in the original file. This ensures that any corrupted data, dummy data, or malicious data isn’t mixed into the final product.

utorrent_hash.jpg

Repair Files with the Checksum
This hash check occurs several times in a torrent client but the most important time, in this case, is when the program starts up. Before clients begin to download, upload, or seed a torrent, the programs do a complete hash check of the data already downloaded and available. With large corrupted files, you can take advantage of this hash check.

  1. Just find a torrent of the exact file in The Pirate Bay, ISOHunt, or TorrentSpy and download it for about a minute.
  2. Then, stop and close the client.
  3. Replace the torrent data file with the corrupted file.
  4. Reopen the client and start the download. The client will perform a hash MD5 check on the current data to see what file segment downloads are necessary. If you correctly found a torrent of the exact file, the client will redownload the segment of the corrupted data and rebuild the file. In the end, you should be good to go!

Cons
There are a couple of caveats for using this method to repair corrupted files.

  • It’s kinda shady. Depending on the file, legality of torrenting may be questionable.
  • You have to find a torrent of the exact file.
  • The torrent tracker must have some IP addresses participating. You may find the torrent of the exact file but that torrent may also be dead.

Leave a comment on your experience with this method or post any other suggestions!


See all rapidshare folders

Use following keywords in google to see all rapidshare folders available on internet

site:rapidshare.com inurl:users "*"

site:rapidshare.de inurl:users "*"

site:rapidshare.com inurl:files "*"

site:rapidshare.de inurl:files "*"

site:rapidshare.com inurl:users (pass|password)

site:rapidshare.de inurl:users (pass|password)

Suppose u need some info on hacking.Then u can try following keywords to see all rapidshare folders having any hacking related thing in it

site:rapidshare.com inurl:users "hack"

site:rapidshare.com inurl:users "hacking

MAKING WINDOWS XP GENUINE THE EASY WAY

download jellybean keyfinder from this website
http://www.magicaljellybean.com/keyfinder.shtml

Now open keyfinder.exe
Click on options and click "change windows key"
Now enter this key and you're done.
*****************************
V2C47-MK7JD-3R89F-D2KXW-VPK3J
*****************************

P.S: this works on windows xp sp2 only......

ppl u can try this out...
this might sound silly but it works perfectly...

TRY INSTALLING IE7 OR MEDIA PLAYER11 or IE8

Dynamically Repeat and Broadcast the Strongest Wireless Networking Signal

“I don’t have Internet access at home.” What a terrible thing to hear! It is so sad when people tell me that the only way they check their email is by visiting public, community-sponsored, unprotected venues like the library. Internet access is almost as essential as utilities. When my sister informed me that she didn’t subscribe to Internet in her apartment complex because it was too expensive, I compared that to having no running water at home. Its like she hasn’t bathed since she moved in!

Taking pity, I set out to solve her dilemma. Luckily, the great thing about living in an apartment complex is that you are usually surrounded by a neighborhood of trusting technology dummies. At least 5 open wireless signals will abound everywhere ... except where you need them the most, in your room. The only place that I could detect a signal was next to the kitchen window. Sadly, it would be too cluttered (and too trashy) to move the computer in the kitchen. However, we could bring the Internet connection to us in the computer room.

"The Little Router That Could" – Tillie on Steroids (Hacked Firmware)

Enter DD-WRT. The release of the Linksys WRT54G Wireless-G Router was a milestone in the computer and networking underworld. When a couple of hackers reverse-engineered the firmware, they were pleasantly surprised to discover that the router was actually running on open-source Linux! With that in mind, a barrage of unofficial router firmware filled the open-source community.

ddwrt_logo.jpgEach variation of the firmware enabled new features, turning the $60 piece of home networking equipment into a very capable network server/router very well worth $600! Options and preferences that you thought were not possible began to appear in the router’s configuration GUI. A couple of talented programmers added functions like antenna power amplification, wireless distribution system, RADIUS server, overclocking, file server, VPN server/client (PPTP, OpenVPN, or SSH), public hotspot portal/gateway, and graphical statistics. Who knew a router with a 200 mhz processor could be such a powerhouse? It's like "The Little Engine that Could."

DD-WRT is just one of the many alternative firmware available that boasts these features. I use this particular firmware because it is most updated and it commands the most community support.

Virtual Wireless Interfaces

One of those "impossible" features mentioned above was the creation of virtual interfaces. With any normal wireless networking piece of equipment, you have one chipset dedicated to a specific role, either client (managed) or server (AP infrastructure). The advent of customizable, Linux-based firmware enabled one chipset to perform both roles at the same time by creating a virtual chipset (interface). DD-WRT allows up to 16 virtual interfaces!

Why does this even matter? The router can establish communication with another access point while, at the same time, the virtual interface shares that connection with WiFi clients on the same channel but a different SSID. These interfaces can even be customized with different encryption schemes. The host AP might require WEP but when you rebroadcast the signal under a different SSID, you can use WPA TKIP/AES. Essentially, the router becomes a repeater.

AutoAP + DD-WRT = Dynamic Wireless Network Repeater

However, DD-WRT by itself is not the solution to my dead-signal problems. The signal quality of the 5 wireless ESSIDs is very intermittent. Sometimes, one is stronger than the other. I want the strongest one repeated by the router. AutoAP is an optional add-on to the DD-WRT firmware. This script dynamically connects to the strongest network available. Therefore, if one AP suddenly dies on me, AutoAP connects to the strongest one and DD-WRT repeats the signal to the entire apartment! AutoAP allows me to plug in the router, wait a minute for initialization, and voila! I can start surfing the Internet via the repeater's SSID almost immediately!

Install and Setup Instructions for Dynamic Wireless Repeater Scheme

Only one configuration is necessary at the beginning. Generally, the router automates everything after the initial setup. DD-WRT and AutoAP, together, literally enable plug-and-play functionality!

Choose Your Weapon (Router) Carefully

First things first, get the right equipment. There is really no point in trying this if you don’t own a router that is fully compatible with DD-WRT and AutoAP. Although the open-source firmware was initially designed for the Linksys WRT54G(x) series, compatibility extended to other makes and models. See the Supported Devices page on the DD-WRT Wiki site for more details.
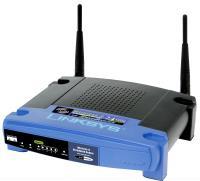
ddwrt_router.jpgMy original router was a WRT54G version 1.1. Sadly, I bricked it last week. So, I had to buy another one. I set my eyes on the Buffalo WHR-G54S ($30 at CircuitCity) since it was the cheapest. I couldn't complain when I discovered that the makers of DD-WRT recommended that particular model the most.

If you decide to go with a different router, get one with a detachable antenna. Nothing is worse than an internal antenna limiting you from achieving better signal range. I mean, you can only increase the antenna power so much until you deteriorate the signal quality, microwave yourself to Leukemia, or plain fry your chipset.

Flash Me!

The next thing you need to do is flash the router with the new firmware. Download the latest cutting-edge version. I used the Version 24 Beta released on 05-10-07. The DD-WRT installation guide can better guide you on flashing the firmware. My only precaution is that if you are doing this for the first time, when the directions say "wait," you wait extra long. It would be completely tragic if you actually performed a successful flash but bricked your router when you reset it during the firmware’s first initialization.

Basic DD-WRT Configuration
  1. In the "Basic Setup" tab, change the router’s local IP address to an obscure subnet that will definitely not conflict with any other network AutoAP connects to. Try 192.168.176.1 if you can’t think of one. Who uses that?
  2. Disable the firewall under the "Security Tab."
  3. Next, visit the "Wireless" "Basic Settings" tab. Under "Physical Interface wl0," it should be running in "Repeater" mode on the "Auto" channel and "Bridged" networking configuration. Leave the SSID field blank as AutoAP will later dynamically fill this field as it finds a new network.
  4. Add a virtual interface. Fill the SSID field with your desired network name. This interface will be the repeater on the network. Make sure "AP Isolation" is disabled and "Network Configuration" is set to "Bridged."
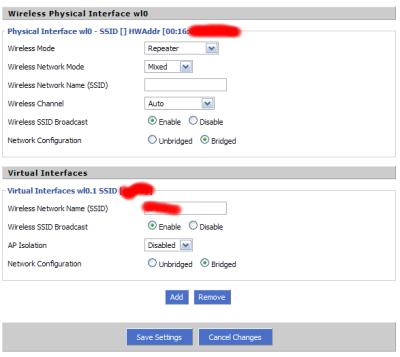
ddwrt_interfaces.jpg

AutoAP Script Installation

Now, its time to install AutoAP! First, you'll need to unprotect your home wireless network so that the DD-WRT router can download the AutoAP script. You will also need the open network to verify and test your setup scheme. Don't worry, it will only be about 15 minutes depending on how quickly you can get this running. One hour tops, I promise. :)

Go to the "Command" tab under "Administration." "Save Startup" these commands:

CODE:
  1. nvram set wl_ssid=""
  2. `cd /tmp; until [ 2 = 1 ];do /bin/sleep 30;
  3. /usr/bin/wget -Oautoap.sh//umn.dl.sourceforge.net/sourceforge/autoap/autoap_test_070219.sh; http:
  4. chmod 777 ./autoap.sh;./autoap.sh;done` &

When you "Save Startup," you are saving commands that the router will run each time it boots. Basically, on line one, the router will connect to any open wireless network. On lines two and three, the router saves the AutoAP script to a temporary directory. And on line 4, the router installs and runs the script.

The Moment of Truth

Reboot the router and check the AutoAP log (http://RouterIP/user/autoap.htm) after a minute to see if it was installed correctly. If the log appears, try to connect to Google. If that is successful, unplug your Ethernet cable from the DD-WRT router and try connecting to the virtual interface SSID that you specified earlier. Try connecting to Google one more time. If that is successful, congratulations! It works!

Tweaks and Additional Configuration

Now, you can resecure your home wireless network and tweak the setup. Optionally, you can visit the "Wireless Security" tab and configure a wireless encryption for your virtual repeater interface. You can also visit "Advanced" settings and increase the "Xmit Power." Try 100 but don’t go beyond 200!
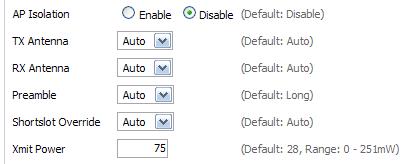
ddwrt_advanced.jpg

Check the AutoAP Wiki for specifics on advanced configuration. But really, it should work out-of-the-box. Just a helpful tip, I would never "nvram commit." I like the variables easily viewable and changeable. Instead, I save my nvram variables in the "Save Startup" without "nvram commit." I save them with the installation code. This assures that I will always have the latest version of AutoAP. If download of the script is unsuccessful no changes will be made. The router will only retain what AutoAP version is in the memory.

Backup, Backup, Backup

Again, if you've advanced this far, congratulations! It's easy street, all downhill from hereon. There should be no more hassles and headaches. Now, it is only a mater of plug-and-play. Once everything is perfect and your tweaks are lined up in a row, I encourage you to backup your configuration in the "Administration" tab. Who knows? Maybe a freak accident in the future will destroy your hard work.

Closing Remarks

Until the my sister can actually afford her own Internet access, she can just turn on the router in kitchen, wait a minute, and start surfing many rooms away on the premises. The beauty of this setup is that it will work anywhere you go. If you want to extend another wireless signal at school, just do the same thing.

Whether your configuration is successful or not, I highly recommend the wikis and forums on Universal Wireless Repeater and AutoAP. Other than this article, if you have any problems or if you get stuck, these are great references. If anything, feel free to just leave a comment on this post and I'll see if I can help you.

Good Luck!

Increase PC Performance by Reducing Shared Video RAM

I don’t know if it’s just me but I think motherboard manufactures changed the way that they handle integrated video memory. I like to buy a new computer every year. Every year around Black Friday, I buy a system on sale and sell my old one on eBay. I think it’s a pretty good setup. You buy the cutting edge equipment and sell what you have before its features phase out of popularity.

Speed Fetish

I do this because I have an obsession with performance. I like to make sure my computers work efficiently. Unfortunately, most computers out of the box are not optimized for performance. They are manufactured with the dumb does-not-know-any-better home user in mind.

Typical performance-boosting tasks I carry out with every new computer I own include doubling the memory, terminating the system restore “feature,” disabling the swap file, and uninstalling the superfluous, “complimentary,” memory-hogging, thread-wasting programs set up by the computer OEM manufacturer. For those who can empathize with me, I absolutely hate WildTangent.

Marketing Lies

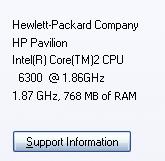
vram_closeap.jpgThe other day I noticed that my new computer was running slower than normal. Suddenly, I saw that ominous bubble saying something like “You are low on memory. Try increasing page file.” “That’s impossible!” I thought. “I have 1 GB of memory!” But when I checked the System applet, it turned out I had 768 MB of memory. I quickly glanced at the features sticker on the front of my tower to verify that I certainly bought a computer with “1GB Blazing-fast DDR2-5300 RAM.” So, what’s the problem?
Sharing Sucks

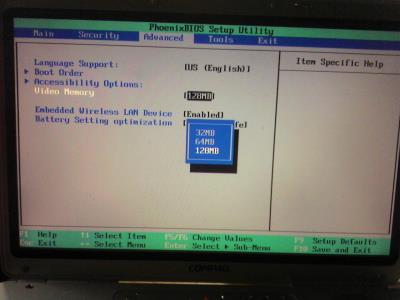
I discovered that the Intel Integrated Graphics Chipset shares the RAM with my motherboard. What gives? That’s fine that it has to share but does it really need to take that much! In my day, we would run fine on 16 MB of VRAM! If you don’t have any high-end graphics requirements like me, why don’t you go into your BIOS and lower that VRAM reservation to the double digits. Your memory-intensive, multitasking, million-tab Firefox windows will thank you.


vram_bios.jpg


Creating a desktop shortcut for locking ur compututer

If you use your computer in an area where others may have access to it, and there are things on your system you would rather have kept confidential, locking your desktop when you leave the computer is an essential task. Here's a recipe for a desktop shortcut that will lock your computer in two easy clicks:

Right click on an empty area of the desktop and choose 'new' then 'shortcut.' The create shortcut wizard will open; in the first text box, type '%windir%\System32\rundll32.exe user32.dll,LockWorkStation' and then give your shortcut an appropriate name on the next page, and hit 'finish.'

You will notice that the shortcut you created has a blank icon. To select a more appropriate one, right click on the shortcut and hit 'properties.' In the 'shortcut' tab, click the 'change icon' button.

In the 'look for icons in this file' box, type '%SystemRoot%\system32\SHELL32.dll' then click 'ok' to see a range of icons for your new shortcut. Choose an appropriate icon. Your desktop locking shortcut is now ready for use. Test it out.

XP hides some system software you might want to remove, such as Windows Messenger, but you can tickle it and make it disgorge everythng. Using Notepad

Navigate to your desktop. On the desktop, right-click and go to New, then to Shortcut (in other words, create a new shortcut). You should now see a pop-up window instructing you to enter a command line path.
Use this path in "Type Location of the Item"
SHUTDOWN -s -t 01
If the C: drive is not your local hard drive, then replace "C" with the correct letter of the hard drive. Click the "Next" button. Name the shortcut and click the "Finish" button. Now whenever you want to shut down, just click on this shortcut and you're done

Modify autoplay for different types of CD

Windows XP includes the ability to perform different actions depending on the type of CD you insert into the drive. For example, you could set your system to always respond to CDs containing MP3 files by opening Windows Media Player.

To edit the Autoplay properties: Open 'my computer'. Right click on the drive you wish to set and select 'properties.' Choose the autoplay tab. Use the dropdown box to see the various recognized types of CD and choose appropriate actions for them.

Renaming The Recycle Bin icon:

To change the name of the Recycle Bin desktop icon, click Start then goto Run, write Regedit and press Enter. It opens Registry Editor. Now in Registry Editor go to:

HKEY_CLASSES_ROOT/CLSID/{645FF040-5081-101B-9F08-00AA002F954E}
and change the name "Recycle Bin" to whatever you want (don't type any quotes)

Locking the desktop

If you are leaving your computer for a while and do not wish to turn it off, but want to assure that no-one else can use the computer while you are away, locking the desktop is the best option.

By pressing WINDOWSKEY+L, you password protect your system just as if you had logged out or restarted the computer. The advantage is that any programs or processes that were running when you locked the desktop will stay open and running in the background, ready for you to resume work or play.

Force windows XP to reboot upon crashing

This registry edit will cause your system to reboot itself automatically upon crashing. This can be useful if you have a reason for keeping your system on 24/7:

Open REGEDIT

Navigate to 'HKEY_LOCAL_MACHINE\SYSTEM
\CurrentControlSet\Control\CrashControl'

Edit the 'AutoReboot' value to '1'

Making Google the Default Search Engine in Internet

Open registry editor by going to Start then Run and entering regedit and navigate to following three keys separately and change it as shown below:

[HKEY_CURRENT_USER\Software\Microsoft\Internet Explorer\Main]
"Search Page"=" http://www.google.com"
"Search Bar"=" http://www.google.com/ie"
[HKEY_CURRENT_USER\Software\Microsoft\Internet Explorer\SearchURL]
""=" http://www.google.com/keyword/%s"
[HKEY_LOCAL_MACHINE\SOFTWARE\Microsoft\Internet Explorer\Search]
"SearchAssistant"=" http://www.google.com/ie" .

Improving the Slow Boot up time:

There are a variety of reasons why your windows XP system would boot slowly. Most of the times it this has to do with the startup applications. If you would like to speed up the bootup sequence, consider removing some of the startup applications that you do not need. Easiest way to remove startup apps is through System Configuration Utility. Go to Start then Run and enter MSCONFIG and go to the Startup tab. Deselect/UnCheck application(s) that you do not want to startup at boot time.

Customize Logon prompt with your Own Words

Open Registry by going to Start then Run, entering regedit and Navigate to [HKEY_LOCAL_MACHINE\SOFTWARE\Microsoft\Windows NT\CurrentVersion\Winlogon]. In right pane, look for key by the name "LogonPrompt". Set its value to whatever text you want to see displayed at login screen

Disable the Disk performance counter(s)

Windows XP contains a built in performance monitor that is constantly examining various areas of your system. This information can be called up using the performance monitor application found in control panel\administrative tools. Of course, most of us have little interest in this sort of performance statistics monitoring, that being more the territory of systems administrators than individual users.

The thing is, XP is still monitoring away, and some of its observation tools can use a considerable amount of resources. The disk monitoring is an example of this, and it's a good idea to turn the disk monitors off if you are not planning to use the performance monitor application.

To do this: Go to the command prompt ('start\run' then type 'cmd') and type 'diskperf -N'

Alternate Method

Win XP comes with many inbuilt performance monitoring applications that constantly examine various parts of the system. This information can be of real use to a system administrator for collecting performance statistics. However, for a home user, these statistics hold no value and since the monitoring happens all the time, it consumes a good deal of system resources. “Disk monitoring”, for example, happens in the background, and turning it off is advisable if you will not be using the performance monitoring applications. To turn it off, type in “diskperf -N” at a command prompt. To bring up the command prompt: go to Start>Run, type in “cmd” and press [Enter].

Using advanced file security settings in Windows

Windows XP is based on the same platform as Windows 2000, and shares that operating system's robust file security options, at least when using the NTFS file system. Unfortunately this security system, which enables an administrator to decide exactly which files and programs any given user will have access to, is not actually implemented by default in Windows XP. This is a concession Microsoft made to avoid confusing basic users of XP Pro, and to cripple XP Home.

The NTFS file security options can be enabled easily enough in XP Pro, but are apparently non-existent in the Home version. Fact is, the tools are there, you just need to look a little bit harder.

To enable NTFS file security in Windows XP Home: First you need to assure that at least your main hard drive is formatted with the NTFS file system. See tip #61 for instructions on this. Restart your system. Just after the memory and BIOS check screen, but before the Windows splash screen comes up, press F8 a few times.

When the Windows boot menu appears, select 'safe mode' from the list of options.

Once Windows has loaded in safe mode, right click the folders and files you would like to change access to. You will notice that the 'security' tab now exists, and thus you are allowed to assign or deny access to individual users for each file, folder and program. Once you are done, restart Windows normally, and your changes will be enforced.

Modify Color Selection of Default Theme:

Open registry by going to Start then Run. Entering regedit, navigate to [HKEY_USERS\.DEFAULT\Software\Microsoft\Windows\CurrentVersion\ThemeManager] and locate the key "ColorName".
Right Click on it and select modify its value from "NormalColor" to "Metallic"
Click Ok, and exit regedit and restart your computer

Removing Multiple Boot Screens:

If you are getting unwanted multiple boot screen
Then Follow these Steps.
1> Right Click on My Computer
2>Select Properties
3>Select Advanced Tab
4>Select Settings In the Startup & Recovery Section(3rd grp)
5>Select the operating system which u want.
6>And Click OK.
7>Further again press the setting and click on Edit.
8>It will open boot.ini File.
9>Now u can delete those o/s which you don't want to be displayed.

Note: For deleting operating systems from boot.ini file, keep it mind that you can't
delete that o/s which is selected by default there. Before
making any changes make a copy of boot.ini file.

Renaming The Start Button:

To rename the start button, you will need a hex editor.
My preference is UltraEdit

Copy the \windows\explore.exe file to a new name (e.g. explorer_1.exe)
With the hex editor, open that file and go to offset 412b6
You will see the word start with blanks between each letter
Edit it be any 5 characters or less
Save the file
Boot to DOS
Copy the existing c:\windows\explorer.exe to explorer.org
Copy explorer_1.exe to explorer.exe
You will also need to replace the explorer.exe in the c:\windows\system32\dllcache file as well with the new one.
Note: If the partition is NTFS and you can't access the files from DOS:

Start Regedit
Go to HKEY_LOCAL_MACHINE \ SOFTWARE \ Microsoft \ Windows NT \ CurrentVersion \ Winlogon.
Change the value of Shell from Explorer.exe to explorer_1.exe

Disabling Unnecessary Programs At Startup:

Many programs add portions of themselves starting automatically on every login.This can be either in the Startup Folder or the Registry. One easy way to tell is by looking at how many icons are in your system tray. If you have a large number, perhaps unnecessary resources are being allocated them as well as increasing your boot time. Typical examples are Microsoft Office, Office FindFast, Real Player, ATI Video setting etc. You can remove them in one of three main ways:

In the Start / Programs / Startup Folder
In the Registry under HKEY_LOCAL_MACHINE \ SOFTWARE \ Microsoft \ Windows \ CurrentVersion \ Run

To convert a FAT partition to NTFS:

Click Start, click Programs, and then click Command Prompt.
In Windows XP, click Start, click Run, type cmd and then click OK.
At the command prompt, type CONVERT [driveletter]: /FS:NTFS.
Convert.exe will attempt to convert the partition to NTFS.
NOTE: Although the chance of corruption or data loss during the conversion from FAT to NTFS is minimal, it is best to perform a full backup of the data on the drive that it is to be converted prior to executing the convert command. It is also recommended to verify the integrity of the backup before proceeding, as well as to run RDISK and update the emergency repair disk (ERD).

Breaking The XP Password:

In case of user password boot the pc in safemode by pressing the F8 key and then selecting the Safe Mode option. You can now logon as an administrator and XP wont prompt for the password. Incase of an administrator account try rebooting the pc in DOS. access C:\Windows\system32\config\sam . Rename SAM as SAM.mj
Now XP wont ask for password next time You Login. Also

Go to the cmd prompt .
Type net user *.
It will list all the users.
Again type net user "administrator" or the name of the administrator "name" *.
e.g.: net user aaaaaa *(where aaaaaa is the name).
It will ask for the password.
Type the password and there you are done.
Logging In As Administrator:

Hold the Ctrl-Alt key and press Del twice. This will bring up the normal login and you can log on as Administrator.

To unhide the Administrator account so it does show up:

Start Regedit

Go to HKEY_LOCAL_MACHINE \ SOFTWARE \ Microsoft \ Windows NT \ CurrentVersion \ Winlogon \ SpecialAccounts \ UserList

Unhide the Administrator key by giving it a value of 1

Automatically run programs when starting Windows

If there are applications or commands that you run every single time you start your computer (Email comes to mind) you may want to consider setting things up so that these programs run automatically during the Windows XP startup. This can be done quite easily in XP by creating shortcuts and shuffling them around.

Here's how: Windows XP has a startup folder located at 'C:\ Documents and Settings\ (your user name)\ Start Menu\ Programs\Startup.' Shortcuts placed into this folder will be run automatically when Windows XP starts up.

If you already have shortcuts for the programs you desire to use, copy and paste them into the startup folder. Otherwise, go to 'start\programs,' select the program you would like to create a shortcut for, right click it and select 'send to' then 'desktop.' This will create a shortcut on the desktop that you can then use.