"The Little Router That Could" – Tillie on Steroids (Hacked Firmware)
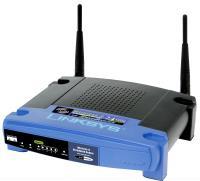
Enter DD-WRT. The release of the Linksys WRT54G Wireless-G Router was a milestone in the computer and networking underworld. When a couple of hackers reverse-engineered the firmware, they were pleasantly surprised to discover that the router was actually running on open-source Linux! With that in mind, a barrage of unofficial router firmware filled the open-source community.
 Each variation of the firmware enabled new features, turning the $60 piece of home networking equipment into a very capable network server/router very well worth $600! Options and preferences that you thought were not possible began to appear in the router’s configuration GUI. A couple of talented programmers added functions like antenna power amplification, wireless distribution system, RADIUS server, overclocking, file server, VPN server/client (PPTP, OpenVPN, or SSH), public hotspot portal/gateway, and graphical statistics. Who knew a router with a 200 mhz processor could be such a powerhouse? It's like "The Little Engine that Could."
DD-WRT is just one of the many alternative firmware available that boasts these features. I use this particular firmware because it is most updated and it commands the most community support.
Virtual Wireless Interfaces
One of those "impossible" features mentioned above was the creation of virtual interfaces. With any normal wireless networking piece of equipment, you have one chipset dedicated to a specific role, either client (managed) or server (AP infrastructure). The advent of customizable, Linux-based firmware enabled one chipset to perform both roles at the same time by creating a virtual chipset (interface). DD-WRT allows up to 16 virtual interfaces!
Why does this even matter? The router can establish communication with another access point while, at the same time, the virtual interface shares that connection with WiFi clients on the same channel but a different SSID. These interfaces can even be customized with different encryption schemes. The host AP might require WEP but when you rebroadcast the signal under a different SSID, you can use WPA TKIP/AES. Essentially, the router becomes a repeater.
AutoAP + DD-WRT = Dynamic Wireless Network Repeater
However, DD-WRT by itself is not the solution to my dead-signal problems. The signal quality of the 5 wireless ESSIDs is very intermittent. Sometimes, one is stronger than the other. I want the strongest one repeated by the router. AutoAP is an optional add-on to the DD-WRT firmware. This script dynamically connects to the strongest network available. Therefore, if one AP suddenly dies on me, AutoAP connects to the strongest one and DD-WRT repeats the signal to the entire apartment! AutoAP allows me to plug in the router, wait a minute for initialization, and voila! I can start surfing the Internet via the repeater's SSID almost immediately!
Install and Setup Instructions for Dynamic Wireless Repeater Scheme
Only one configuration is necessary at the beginning. Generally, the router automates everything after the initial setup. DD-WRT and AutoAP, together, literally enable plug-and-play functionality!
Choose Your Weapon (Router) Carefully
First things first, get the right equipment. There is really no point in trying this if you don’t own a router that is fully compatible with DD-WRT and AutoAP. Although the open-source firmware was initially designed for the Linksys WRT54G(x) series, compatibility extended to other makes and models. See the Supported Devices page on the DD-WRT Wiki site for more details.
 My original router was a WRT54G version 1.1. Sadly, I bricked it last week. So, I had to buy another one. I set my eyes on the Buffalo WHR-G54S ($30 at CircuitCity) since it was the cheapest. I couldn't complain when I discovered that the makers of DD-WRT recommended that particular model the most.
If you decide to go with a different router, get one with a detachable antenna. Nothing is worse than an internal antenna limiting you from achieving better signal range. I mean, you can only increase the antenna power so much until you deteriorate the signal quality, microwave yourself to Leukemia, or plain fry your chipset.
Flash Me!
The next thing you need to do is flash the router with the new firmware. Download the latest cutting-edge version. I used the Version 24 Beta released on 05-10-07. The DD-WRT installation guide can better guide you on flashing the firmware. My only precaution is that if you are doing this for the first time, when the directions say "wait," you wait extra long. It would be completely tragic if you actually performed a successful flash but bricked your router when you reset it during the firmware’s first initialization.
Basic DD-WRT Configuration
- In the "Basic Setup" tab, change the router’s local IP address to an obscure subnet that will definitely not conflict with any other network AutoAP connects to. Try 192.168.176.1 if you can’t think of one. Who uses that?
- Disable the firewall under the "Security Tab."
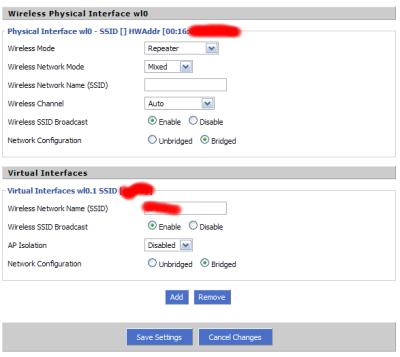
- Next, visit the "Wireless" "Basic Settings" tab. Under "Physical Interface wl0," it should be running in "Repeater" mode on the "Auto" channel and "Bridged" networking configuration. Leave the SSID field blank as AutoAP will later dynamically fill this field as it finds a new network.
- Add a virtual interface. Fill the SSID field with your desired network name. This interface will be the repeater on the network. Make sure "AP Isolation" is disabled and "Network Configuration" is set to "Bridged."
AutoAP Script Installation
Now, its time to install AutoAP! First, you'll need to unprotect your home wireless network so that the DD-WRT router can download the AutoAP script. You will also need the open network to verify and test your setup scheme. Don't worry, it will only be about 15 minutes depending on how quickly you can get this running. One hour tops, I promise. 
Go to the "Command" tab under "Administration." "Save Startup" these commands:
CODE:
-
nvram set wl_ssid=""
-
`cd /tmp; until [ 2 = 1 ];do /bin/sleep 30;
-
/usr/bin/wget -Oautoap.sh//umn.dl.sourceforge.net/sourceforge/autoap/autoap_test_070219.sh; http:
-
chmod 777 ./autoap.sh;./autoap.sh;done` &
When you "Save Startup," you are saving commands that the router will run each time it boots. Basically, on line one, the router will connect to any open wireless network. On lines two and three, the router saves the AutoAP script to a temporary directory. And on line 4, the router installs and runs the script.
The Moment of Truth
Reboot the router and check the AutoAP log (http://RouterIP/user/autoap.htm) after a minute to see if it was installed correctly. If the log appears, try to connect to Google. If that is successful, unplug your Ethernet cable from the DD-WRT router and try connecting to the virtual interface SSID that you specified earlier. Try connecting to Google one more time. If that is successful, congratulations! It works!
Tweaks and Additional Configuration
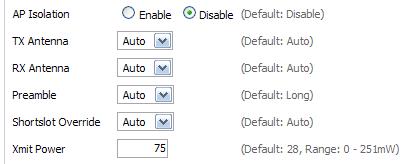
Now, you can resecure your home wireless network and tweak the setup. Optionally, you can visit the "Wireless Security" tab and configure a wireless encryption for your virtual repeater interface. You can also visit "Advanced" settings and increase the "Xmit Power." Try 100 but don’t go beyond 200!
Check the AutoAP Wiki for specifics on advanced configuration. But really, it should work out-of-the-box. Just a helpful tip, I would never "nvram commit." I like the variables easily viewable and changeable. Instead, I save my nvram variables in the "Save Startup" without "nvram commit." I save them with the installation code. This assures that I will always have the latest version of AutoAP. If download of the script is unsuccessful no changes will be made. The router will only retain what AutoAP version is in the memory.
Backup, Backup, Backup
Again, if you've advanced this far, congratulations! It's easy street, all downhill from hereon. There should be no more hassles and headaches. Now, it is only a mater of plug-and-play. Once everything is perfect and your tweaks are lined up in a row, I encourage you to backup your configuration in the "Administration" tab. Who knows? Maybe a freak accident in the future will destroy your hard work.
Closing Remarks
Until the my sister can actually afford her own Internet access, she can just turn on the router in kitchen, wait a minute, and start surfing many rooms away on the premises. The beauty of this setup is that it will work anywhere you go. If you want to extend another wireless signal at school, just do the same thing.
Whether your configuration is successful or not, I highly recommend the wikis and forums on Universal Wireless Repeater and AutoAP. Other than this article, if you have any problems or if you get stuck, these are great references. If anything, feel free to just leave a comment on this post and I'll see if I can help you.
Good Luck!


 Anyone can forget typing that additional "s" in the URL so a better alternative is to outsource this job to Customize Google.


 Flash Video (flv) has become the default video format on the web and almost
 To extract audio from flv files, get the free FLV Extract utility from
  Q. Where can you upload FLV Video files on the web ?
 Q. How to create new FLV movies files from scratch ?


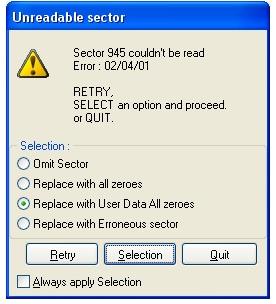 Corrupted *.ISO Image File
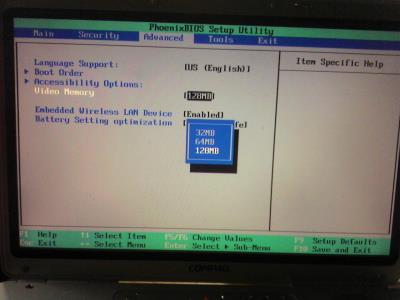
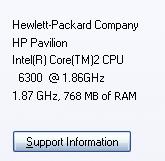 The other day I noticed that my new computer was running slower than normal. Suddenly, I saw that ominous bubble saying something like “You are low on memory. Try increasing page file.” “That’s impossible!” I thought. “I have 1 GB of memory!” But when I checked the System applet, it turned out I had 768 MB of memory. I quickly glanced at the features sticker on the front of my tower to verify that I certainly bought a computer with “1GB Blazing-fast DDR2-5300 RAM.” So, what’s the problem?